blender version 2.66
import bpy

def createMeshFromData(name, origin, verts, faces):
    # Create mesh and object
    me = bpy.data.meshes.new(name+'Mesh')
    ob = bpy.data.objects.new(name, me)
    ob.location = origin
    ob.show_name = True

    # Link object to scene and make active
    scn = bpy.context.scene
    scn.objects.link(ob)
    scn.objects.active = ob
    ob.select = True

    # Create mesh from given verts, faces.
    me.from_pydata(verts, [], faces)
    # Update mesh with new data
    me.update()
    return ob

verts = ( (1,0, 2), (0,1, 2), (-1,0, 2), (0,-1, 2), # top
          (1,0,-2), (0,1,-2), (-1,0,-2), (0,-1,-2), # bottom
          ( 2,1,0), ( 2,0,1), ( 2,-1,0), ( 2,0,-1), #x+
          (-2,1,0), (-2,0,1), (-2,-1,0), (-2,0,-1), #x-
          (1, 2,0), (0, 2,1), (-1, 2,0), (0, 2,-1), #y+
          (1,-2,0), (0,-2,1), (-1,-2,0), (0,-2,-1) #y-
)
faces=( (0,1,2,3), (4,7,6,5),
        (8,9,10,11), (12,15,14,13),
        (16,19,18,17), (20,21,22,23),
        (16,17,1,0,9,8),
        (8,11,4,5,19, 16),
        (11,10, 20,23,7,4),
        (0,3,21,20,10,9),
        (3,2, 13,14, 22,21),
        (23,22, 14,15, 6,7),
        (2,1, 17,18, 12,13),
        (18,19, 5,6, 15, 12),
 )

to = createMeshFromData('truncOct', (0,0,0), verts, faces)


to.data.materials.append(bpy.data.materials['stork'])

to.data.uv_textures.new("hippo")
the createMeshFromData() function I borrowed from examples on the internet.
The uv_textures.new() call is important if you want the object to have
a UV mesh. The default mesh gives each ngon its own uv coordinates
that fill the square. It's a convenient default for polyhedra that
don't have a wrap-around texture.
def popUpMaterial( c, t0, t1, t2, t3):
    rval = bpy.data.materials.new('fadeIn')
    rval.use_transparency=1
    rval.diffuse_color=(1,1,1)
    rval.alpha=0
    rval.emit=1
    rval.diffuse_intensity=0
    rval.keyframe_insert(data_path='alpha', frame=t0)
    rval.alpha=1
    rval.keyframe_insert(data_path='alpha', frame=t1)
    rval.keyframe_insert(data_path='diffuse_color', frame=t1)
    rval.keyframe_insert(data_path='diffuse_intensity', frame=t1)
    rval.keyframe_insert(data_path='emit', frame=t1)
    rval.diffuse_color=c
    rval.emit=0.2
    rval.diffuse_intensity=0.7
    rval.keyframe_insert(data_path='diffuse_color', frame=t2)
    rval.keyframe_insert(data_path='diffuse_intensity', frame=t2)
    rval.keyframe_insert(data_path='emit', frame=t2)

    for curve in rval.animation_data.action.fcurves.items():
        #print (curve[1].data_path )
        if 'diffuse_color'==curve[1].data_path:
            curve[1].keyframe_points.items()[1][1].interpolation = 'LINEAR'


    rval.diffuse_color=(0.5,0.5,0.5)
    rval.keyframe_insert(data_path='diffuse_color', frame=t3)

    return rval
This python function creates a material that starts out white
(diffuse_color=(1,1,1), but completely transparent (alpha=0). We put
a keyframe at t0 to mark the start of the animation.
Then the material fades to solid (alpha=1) at t1. We add some keyframes to the 'diffuse_color' and 'diffuse_intensity' data_paths because from t1 to t2 the material fades from solid white to solid color c. We also fiddle with the 'emit' and 'diffuse_intensity' to let the sunlight and color take over from a bright unshaded white.
Finally we fade to grey at t3.
Also, since keyframes like to default to bezier curves, I had to set them to linear. I'm not sure if there's a way to set that at the time you perform keyframe_insert()
Another important note is that data_path is slightly undocumented. The best way to figure out what it should be is to mouse over the UI element in the Material tab of the Properties panel. A tooltip will appear with stuff like bpy.data.materials["flashIn.025"].alpha, that 'alpha' is what you use for data_path.
addLump(0.0, 0.0, 0.0,  1)
addLump(-2.0, -2.0, 2.0,  2)
addLump(0.0, 0.0, 4.0,  3)
addLump(0.0, -4.0, 0.0,  4)
addLump(2.0, 2.0, 6.0,  5)
addLump(4.0, 4.0, 4.0,  6)
Now I just have to write the addLump function.
# The following function is adapted from
# Nick Keeline "Cloud Generator" addNewObject
# from object_cloud_gen.py (an addon that comes with the Blender 2.6 package)
#
def duplicateObject(scene, name, copyobj):

    # Create new mesh
    mesh = bpy.data.meshes.new(name)

    # Create new object associated with the mesh
    ob_new = bpy.data.objects.new(name, mesh)

    # Copy data block from the old object into the new object
    ob_new.data = copyobj.data.copy()
    ob_new.scale = copyobj.scale
    ob_new.location = copyobj.location

    while 0<len(ob_new.data.materials.items()):
        ob_new.data.materials.pop(0,1)

    # Link new object to the given scene and select it
    scene.objects.link(ob_new)
    ob_new.select = True

    return ob_new

def putInGroup(o, gn):

    if gn in bpy.data.groups:
        group = bpy.data.groups[gn]
    else:
        group = bpy.data.groups.new(gn)

    group.objects.link(o)

def addLump(x,y,z, t):
    o2 = duplicateObject(bpy.context.scene, "lump", bpy.context.object)
    o2.location = (x,y,z)
    o2.hide_render=1
    o2.hide = 1
    fr = t*10
    o2.keyframe_insert(data_path="hide_render", frame=1)
    o2.keyframe_insert(data_path="hide", frame=1)
    o2.hide_render = 0
    o2.hide = 0
    o2.keyframe_insert(data_path="hide_render", frame=fr)
    o2.keyframe_insert(data_path="hide", frame=fr)
    m1 = popUpMaterial( (0,0.8,0) , fr, fr+7, fr+20, fr+600)
    o2.data.materials.append(m1)
    o2.data.uv_textures.new("hippo")
    putInGroup(o2, "lumps")
This function, combined with the output of the simulator will copy the
currently selected object
(bpy.context.object) and create lumps that
pop-in over time.
Putting all the lumps into a single group makes it easy to select (blender shift-g) and delete them when I decide to change any of my tech.
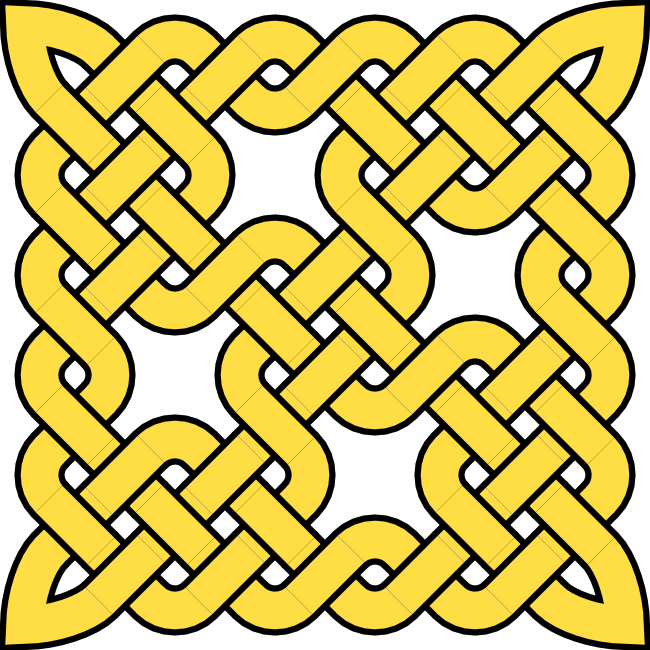
I wrote a java app that generates SVG of celtic knotwork. I then had to figure out how to work this into the pop-in textures. I had a vision that I'd keep the fade-in to bright unshaded (emit=1) white, and then fade down to the green with knotwork overlay.
To accomplish this I needed a node-based material. The biggest
roadblock was that blender's material node system didn't have an
AlphaOverlay node, only a Mix node. (The compositor has AlphaOverlay,
but evidently the need for translucent node materials wasn't high on
the busy coders' list of things to do). With help from the #blender
channel I was able to come up with a scheme to fade from the
translucent white to translucent white over green+knots.

We'll start with the material that "flashes in". It is pure white, with emit=1 and diffuse_intensity=0 (so it's unaffected by lights and bright. But we animate the alpha channel so it fades in and then out.
def findCurve(animation_data, data_path):
    for c in animation_data.action.fcurves.values():
        if c.data_path == data_path:
            return c

def flashIn(t0, t1, t2):
    rval = bpy.data.materials.new('flashIn')

    rval.use_transparency=1
    rval.diffuse_color=(1,1,1)
    rval.alpha=0
    rval.emit=1
    rval.diffuse_intensity=0
    rval.specular_intensity=0

    rval.keyframe_insert(data_path='alpha', frame=t0)

    rval.alpha=1
    rval.keyframe_insert(data_path='alpha', frame=t1)

    rval.alpha=0
    rval.keyframe_insert(data_path='alpha', frame=t2)

    kp = findCurve(rval.animation_data, 'alpha').keyframe_points.values()
    kp[0].interpolation='LINEAR'
    kp[1].interpolation= 'LINEAR'

    return rval
We also need a material that starts invisible, pops in solid, and then
fades to grey (to make the lump old)
def fadeToGrey(c, c2, t0, t1, t2):
    mat = bpy.data.materials.new('fadeToGrey')

    mat.use_transparency=1
    mat.diffuse_color=c
    mat.specular_intensity=0.1
    mat.alpha=0
    mat.emit=0.2

    mat.keyframe_insert(data_path='alpha', frame =1)

    mat.alpha=1
    mat.keyframe_insert(data_path='alpha', frame=t0)

    mat.keyframe_insert(data_path='diffuse_color', frame=t1)

    mat.diffuse_color=c2
    mat.keyframe_insert(data_path='diffuse_color', frame=t2)

    fc = findCurve(mat.animation_data, 'alpha')
    kp = fc.keyframe_points.values()
    kp[0].interpolation = 'CONSTANT'
    kp[1].interpolation = 'LINEAR'


    return mat
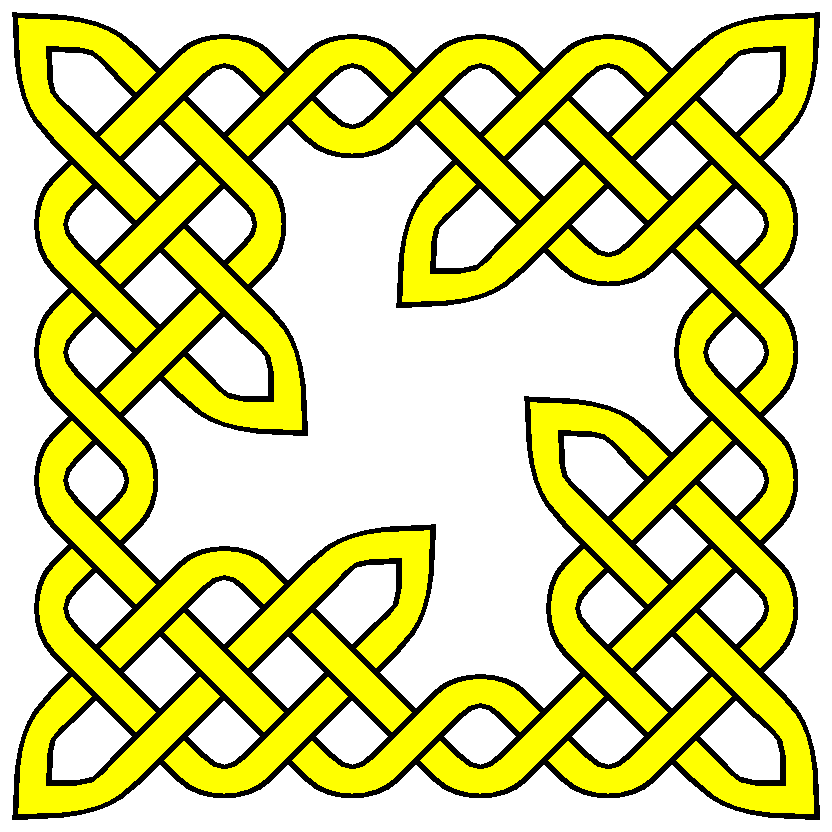 I
decided the original knot obscured too much of the green material, so
I decided to knock some material out of the middle. Writing rules
that wove the lines properly started to hurt my brain, so I wrote an
interactive knotwork editor in java/swing.
I loaded the knotwork into blender by making it a texture on a
material on a hidden mesh. Always remember to set the Texture /
Mapping / Coordinates option to UV instead of the default (Generated
?)
I
decided the original knot obscured too much of the green material, so
I decided to knock some material out of the middle. Writing rules
that wove the lines properly started to hurt my brain, so I wrote an
interactive knotwork editor in java/swing.
I loaded the knotwork into blender by making it a texture on a
material on a hidden mesh. Always remember to set the Texture /
Mapping / Coordinates option to UV instead of the default (Generated
?)
def materialNodeMix(mat, solid, flash, texture):

    mat.use_nodes = 1

    for node in mat.node_tree.nodes.values() :
        mat.node_tree.nodes.remove(node)

    l= mat.node_tree.links

    nm1 = mat.node_tree.nodes.new('MATERIAL')
    nm1.location = (0,200)
    nm1.material = solid

    nm2 = mat.node_tree.nodes.new('MATERIAL')
    nm2.location = (300,0)
    nm2.material = flash

    nx1 = mat.node_tree.nodes.new('MIX_RGB')
    nx1.location = (300,200)

    nm3 = mat.node_tree.nodes.new('TEXTURE')
    nm3.location = (100,0)
    nm3.texture = texture

    ng = mat.node_tree.nodes.new("GEOMETRY")
    ng.location = (-150,0)

    l.new(ng.outputs['UV'], nm3.inputs['Vector'])

    l.new(nm1.outputs['Color'], nx1.inputs['Color1'])
    l.new(nm3.outputs['Color'], nx1.inputs['Color2'])
    l.new(nm3.outputs['Value'], nx1.inputs['Fac'])

    nx2 = mat.node_tree.nodes.new('MATH')
    nx2.operation = 'MAXIMUM'
    nx2.location = (450,400)

    l.new(nm1.outputs['Alpha'], nx2.inputs[0])
    l.new(nm2.outputs['Alpha'], nx2.inputs[1])

    nx4 = mat.node_tree.nodes.new('MIX_RGB')
    nx4.location = (450,200)

    l.new(nm1.outputs['Alpha'], nx4.inputs['Fac'])
    l.new(nx1.outputs[0], nx4.inputs['Color2'])
    l.new(nm2.outputs['Color'], nx4.inputs['Color1'])

    nx3 = mat.node_tree.nodes.new('MIX_RGB')
    nx3.location = (600,100)

    l.new(nx4.outputs[0], nx3.inputs['Color1'])
    l.new(nm2.outputs['Color'], nx3.inputs['Color2'])
    l.new(nm2.outputs['Alpha'], nx3.inputs['Fac'])

    no = mat.node_tree.nodes.new('OUTPUT')
    no.location = (750,200)

    l.new(nx3.outputs['Color'], no.inputs['Color'] )
    l.new(nx2.outputs[0], no.inputs['Alpha'])

def knotworkMaterial(c, m2, t0, t1, t2, t3):
    mat = bpy.data.materials.new("popIn")

    materialNodeMix(mat, fadeToGrey( (0,0.8,0), (0.5,0.5,0.5), t1, t2, t3),
    m2,
    bpy.data.textures['knot 2'] )

    #mat.use_face_texture = 1
    #mat.use_face_texture_alpha=1
    mat.use_transparency = 1
    mat.specular_intensity = 0.1

    return mat

mfi = flashIn(fr, fr+7, fr+17)
m1 = knotworkMaterial( (0,0.8,0), mfi, fr, fr+7, fr+20, fr+600)
import bpy
import bmesh

def createMeshFromData(name, origin, verts, faces):
    # Create mesh and object
    me = bpy.data.meshes.new(name+'Mesh')
    ob = bpy.data.objects.new(name, me)
    ob.location = origin
    ob.show_name = True

    # Link object to scene and make active
    scn = bpy.context.scene
    scn.objects.link(ob)
    scn.objects.active = ob
    ob.select = True

    # Create mesh from given verts, faces.
    me.from_pydata(verts, [], faces)
    # Update mesh with new data
    me.update()
    return ob

verts = ( (1,0, 2), (0,1, 2), (-1,0, 2), (0,-1, 2), # top
          (1,0,-2), (0,1,-2), (-1,0,-2), (0,-1,-2), # bottom
          ( 2,1,0), ( 2,0,1), ( 2,-1,0), ( 2,0,-1), #x+
          (-2,1,0), (-2,0,1), (-2,-1,0), (-2,0,-1), #x-
          (1, 2,0), (0, 2,1), (-1, 2,0), (0, 2,-1), #y+
          (1,-2,0), (0,-2,1), (-1,-2,0), (0,-2,-1), #y-

)
faces=[ (0,1,2,3), (4,7,6,5),
        (8,9,10,11), (12,15,14,13),
        (16,19,18,17), (20,21,22,23),
 ]
f2 = ((16,17,1,0,9,8),
        (8,11,4,5,19, 16),
        (11,10, 20,23,7,4),
        (0,3,21,20,10,9),
        (3,2, 13,14, 22,21),
        (23,22, 14,15, 6,7),
        (2,1, 17,18, 12,13),
        (18,19, 5,6, 15, 12)
        )

for f in f2:
    i0 = len(verts)
    v0 =verts[f[0]]
    v3 = verts[f[3]]
    v7 = ((v0[0]+v3[0])/2 ,
    (v0[1]+v3[1])/2 ,
    (v0[2]+v3[2])/2 )

    verts = verts + (v7,)
    newF = [ (i0, f[j], f[(j+1)%6]) for j in range(len(f)) ]
    faces .extend(newF)


to = createMeshFromData('truncOct', (0,0,0), verts, faces)


to.data.materials.append(bpy.data.materials['stork'])

def truncOctUV(to):
    to.data.uv_textures.new("hippo")

    bm = bmesh.new()
    bm.from_mesh(to.data)

    uv_layer = bm.loops.layers.uv[0]

    for fi in range(6, len(bm.faces)):
        print(bm.faces[fi])
        bm.faces[fi].loops[0][uv_layer].uv = (0.5,0.5)

    bm.to_mesh(to.data)

truncOctUV(to)
inappropriate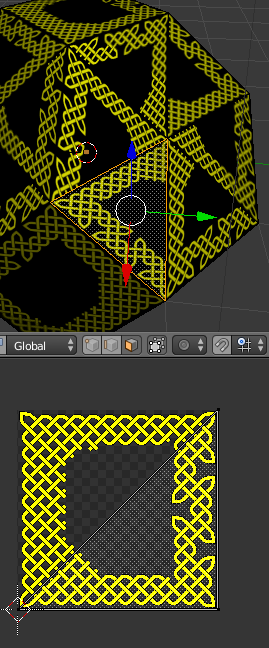
|
better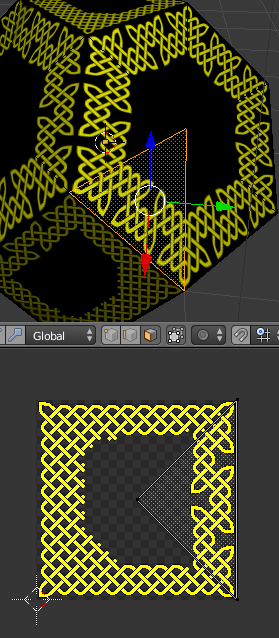
|
The default UV map constructed by blender has one of the coordinates wrong for our particular application. That's why we use a bmesh to edit them in the truncOctUV() function. We programmatically move the UV coordinate of the center vertex (loops[0]) from its default position to 0.5,0.5, the center of the knotwork texture.
The bits involving the bmesh caused me a lot of headache. A lot of the examples on the internet are for older versions of blender. Also, I kept forgetting to "import bmesh" and blender doesn't have a good UI for showing you the python errors.
def knotworkMaterial2(c, m2, t0, t1, t2, t3):
    mat = bpy.data.materials.new("popIn")

    materialNodeMix(mat, fadeToGrey( c, (0.5,0.5,0.5), t1, t2, t3),
    m2,
    bpy.data.textures['knot 3'] )

    #mat.use_face_texture = 1
    #mat.use_face_texture_alpha=1
    mat.use_transparency = 1
    mat.specular_intensity = 0.1

    return mat
I still haven't figured out how I want to pace the pop-in of lumps, so I have a function I can fiddle with
def frameForNode(nodeNum):
    nodeCount=1000
    x2 = 1-(nodeNum/nodeCount)
    return 3600*(1-x2*x2)
And it's kind of handy to have nodes that aren't rendered to also disappear from the 3D view. (it can be a pain in the butt at other times).
def animateVisibility(o2, fr):

    o2.hide_render=1
    o2.hide = 1
    o2.keyframe_insert(data_path="hide_render", frame=1)
    o2.keyframe_insert(data_path="hide", frame=1)
    o2.hide_render = 0
    o2.hide = 0
    o2.keyframe_insert(data_path="hide_render", frame=fr)
    o2.keyframe_insert(data_path="hide", frame=fr)
And finally, a new version of addLump that glues it all together
def addLump(x,y,z, t):
    o2 = duplicateObject(bpy.context.scene, "lump", bpy.context.object)

    o2.location = (x,y,z)
    fr = frameForNode(t)
    animateVisibility(o2, fr)

    mfi = flashIn(fr, fr+7, fr+17)
    m1 = knotworkMaterial( (0,0.8,0), mfi, fr, fr+7, fr+20, fr+600)
    m3 = knotworkMaterial2((0,0,1), mfi, fr, fr+7, fr+20, fr+600)
    o2.data.materials.append(m1)
    o2.data.materials.append(m3)

    for fi in range(6, len(o2.data.polygons)):
        o2.data.polygons[fi].material_index=1

    o2.data.uv_textures.new("hippo")
    putInGroup(o2, "lumps")
The bit of magic at the end with 'material_index' is how we get
different materials on different faces. The faces default to the
green and gold knotwork for the squares (m1), but that's only
appropriate for faces 0..5 (the squares). For the triangles of the
hexagonal faces (6 and up) we want them to use the blue and gold
knotwork, so we adjust the material_index to refer to m3.